

What is smile design? Digital smile design (DSD) step by step
Digital smile design (DSD) means planning the future smile on facial photographs, video and a digital scan of the mouth before treatment begins, and showing it to the patient. The shape, size and position of the teeth are built to match the facial reference lines (eye line, lip line, midline), and this design is then tested in the mouth with a temporary material — the mock-up. The aim is not to guess the result, but to see it and agree on it in advance.
Key points
- DSD is not a treatment but a planning tool: it comes before veneers, crowns, orthodontics or implant treatment.
- The design is built around the face, not the teeth — which is why facial photographs and a video of your smile are needed, not just intraoral pictures.
- The mock-up stage is the most important step: you see the result in your own mouth, speak, smile and give feedback; the teeth have not been touched yet.
- Studies show higher patient satisfaction and greater acceptance of the plan in treatments carried out with DSD, but the evidence base is still limited and the studies differ greatly from one another.
- The quality of the design depends not on the software but on the decisions of the dentist who creates it.
Why is smile design needed?
In the older approach, the patient says make it beautiful, the dentist and technician make veneers according to their own idea, and the result only becomes visible once they are bonded. If it is not liked, changing it is difficult and expensive.
DSD reverses this order: the result is seen first on the screen, then in the mouth in a temporary form, the patient and dentist agree, and only after that are the teeth touched. The authors of a review published in 2019 put it this way: the patient turns from a passive recipient into the first commentator on the plan, and knows from the very beginning of the process what is going to happen.
This benefits both sides. The patient clarifies their expectations and is protected from surprises. The dentist, in turn, calculates in advance how much each tooth will be prepared, where gum contouring is needed and which material is suitable.
The process step by step
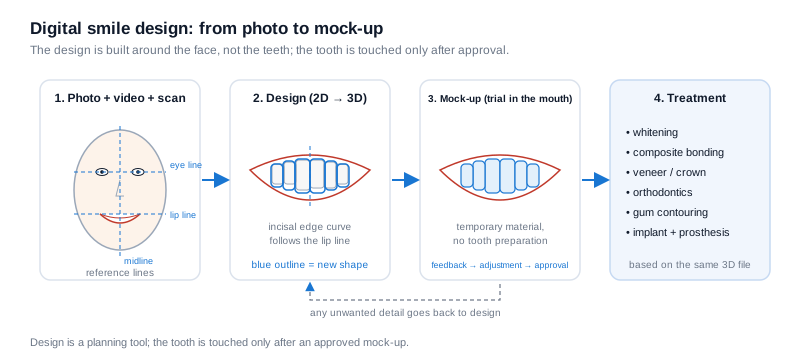 Diagram: reference lines over the face and smile frame → 2D/3D design → mock-up in the mouth → treatment.
1. Collecting records: photos, video, scan
The standard set includes facial photographs (with a natural smile, with a serious expression, in profile), intraoral photographs and a short video taken while smiling and speaking. The video matters because a smile is not static — how much of the teeth shows as the lips move, how the midline shifts: a photograph cannot show this.
Next, a 3D model of the teeth and gums is obtained with an intraoral scanner (a camera that takes a digital impression of the mouth). Where needed, an X-ray or 3D imaging is added as well — especially if implant or gum surgery is being planned.
2. Facial reference lines and analysis
In the design software (this may be a dedicated DSD application or a general graphics program), reference lines are drawn over the photographs: the horizontal line joining the pupils, the line of the lip corners, the midline of the face. The review literature divides the parameters assessed in the design into three groups: facial analysis (symmetry, proportions, profile), dentogingival analysis (gum line, gingival zeniths — the highest point of the gum over each tooth, the buccal corridors visible in the smile) and dental analysis (size, shape, incisal edge curve, colour).
In practice it looks like this: does the midline of the teeth coincide with the midline of the face? Do the incisal edges of the upper teeth follow the curve of the lower lip? How much larger are the central teeth than the lateral ones? How much gum shows when you smile? The answers form the basis of the design.
3. Design: from 2D to 3D
First the outline of the future teeth is drawn over the photograph — this is the 2D design, and it is enough for the first discussion with the patient. This outline is then transferred to the 3D model from the intraoral scan: the new shape of the teeth is modelled at real size, with the real gums and the real bite. This is called a digital wax-up (the digital version of the wax model).
In our clinic, Dr. Bakhtiyar creates this design personally — it is not sent to an outside laboratory, because design decisions (how much will be prepared, which tooth will be lengthened, where the gum line will sit) are the decisions of the dentist planning the treatment.
4. Mock-up: testing the design in the mouth
A silicone key or a printed model is made from the 3D model, and with its help the design is transferred directly onto the teeth in a temporary composite material. The teeth are not touched; the material sets within a few minutes. You look in the mirror, speak, smile and have photographs taken. Anything you do not like — this tooth is too long, this corner is too sharp — is corrected there and then, or sent back into the design.
This is the stage that makes the biggest difference in the process. A picture on a screen is one thing; feeling it in your own mouth is another.
5. Approval and treatment
The agreed mock-up becomes the template for every subsequent step: preparation is carried out through the mock-up (only the necessary depth is removed), the temporary veneers have the shape of the mock-up, and the final restorations are made in the laboratory or with a CAD/CAM system from the same 3D file. In other words, the shape you have seen and approved carries through to the final result unchanged.
The patient role
In DSD, the patient does not simply say I agree or I do not agree. What is useful is specific feedback:
- Photographs of you when you were younger — many people want a result close to their own former smile.
- What you do not like: the colour, the length, the fear of horse teeth, showing gum.
- What you want to keep: a natural slight asymmetry, a characteristic shape.
- Everyday life: your profession, how often you are in front of a camera, whether very white teeth suit you.
This is exactly where the systematic review sees the benefit of DSD: communication, aligning expectations and understanding the plan. The same review found only seven studies published up to 2025; the results favour DSD, but because the study designs and measurement methods differ widely, the authors advise caution. We do not give figures either — we simply say that seeing the result in advance logically reduces dissatisfaction.
Which treatments come after the design?
DSD itself does not change the teeth; it shows which treatment is needed. As a result of the design, the plan may look like this:
| Identified in the design | Treatment step |
|---|---|
| The colour is not light, the shape is good | Whitening, perhaps small composite corrections |
| The teeth are short, too much gum shows | Gum contouring, then veneers or composite |
| Shape, size and colour all need to change | Ceramic veneers (4–10 teeth) |
| The teeth are crooked, there is not enough space | Orthodontics first, then veneers if needed |
| The tooth is cracked, with a large filling | A crown, together with veneers |
| The teeth are heavily worn, the bite height is lost | Full mouth rehabilitation — planned together with the occlusion |
When each of these methods is appropriate is set out as a map in the article on aesthetic restoration of the front teeth. If veneers are planned, the article what is a veneer explains the rest of the process, and at the clinic veneer treatment begins precisely with the design stage. You can read about restorations being made with CAD/CAM from the same digital file in the article same-day crown with CAD/CAM; for cases where many teeth and the bite change together, full mouth rehabilitation is a separate topic.
The limitations of DSD
We should be honest: DSD is not magic.
- The software does not make decisions. The review literature shows that some dental programs are weak in facial analysis, while general graphics programs are weak in dental analysis; it is the dentist who selects and interprets the parameters.
- 2D photographs create perspective illusions. The camera angle can distort the midline and symmetry, which is why checking with a 3D scan and a mock-up matters.
- Function is not separate from aesthetics. An incisal edge that looks beautiful but contacts the lower teeth in the bite will fracture quickly. The design is checked together with the bite and jaw movements.
- The mock-up is not the final result itself. The colour and translucency will be different in ceramic; the mock-up shows shape and position.
Frequently asked questions
How many appointments are needed for a smile design? Usually two: at the first, photographs, video and a scan are taken; at the second, the design is discussed and the mock-up is done. In complex cases the design may be updated several times.
Is the mock-up painful and does it harm the teeth? No. The teeth are not prepared and no anaesthesia is needed; the material is placed on top of the tooth and is easily removed afterwards.
Can I walk around with the mock-up for a few days? Most often it is removed the same day, but in some cases it can be kept for a short time so that you can get the opinion of those close to you — you agree this with your dentist.
Is the design also used for orthodontics and implants? Yes. The final position of the teeth and the shape of the teeth on implants are planned in advance on the same principle; the orthodontist or surgeon then works towards that target.
Can the result differ from the mock-up? Because the shape and position come from the same file, it is very close. The colour, surface translucency and gloss of ceramic differ from the mock-up material — this difference is explained in advance.
Conclusion
Digital smile design is a process that plans the future smile around the face and tests it on the screen and then in the mouth. Its main value is not a beautiful picture but the decisions made before the teeth are touched: how much will be prepared, which treatment will follow in which order, and whether you are happy with the result. A consultation is the first step towards assessing your individual situation and creating the design.
Sources
- Digital Smile Design and Patient-Centered Outcomes in Esthetic Restorative Dentistry: A Systematic Review — Cureus, 2025
- Dental Restorative Digital Workflow: Digital Smile Design from Aesthetic to Function — Dentistry Journal (Basel), 2019
- The application of parameters for comprehensive smile esthetics by digital smile design programs: A review of literature — The Saudi Dental Journal, 2018
This article is for general information only and does not replace an individual diagnosis, examination or treatment. Consult a doctor for a decision about your case.