

How is tooth colour chosen? Shade matching for veneers and crowns
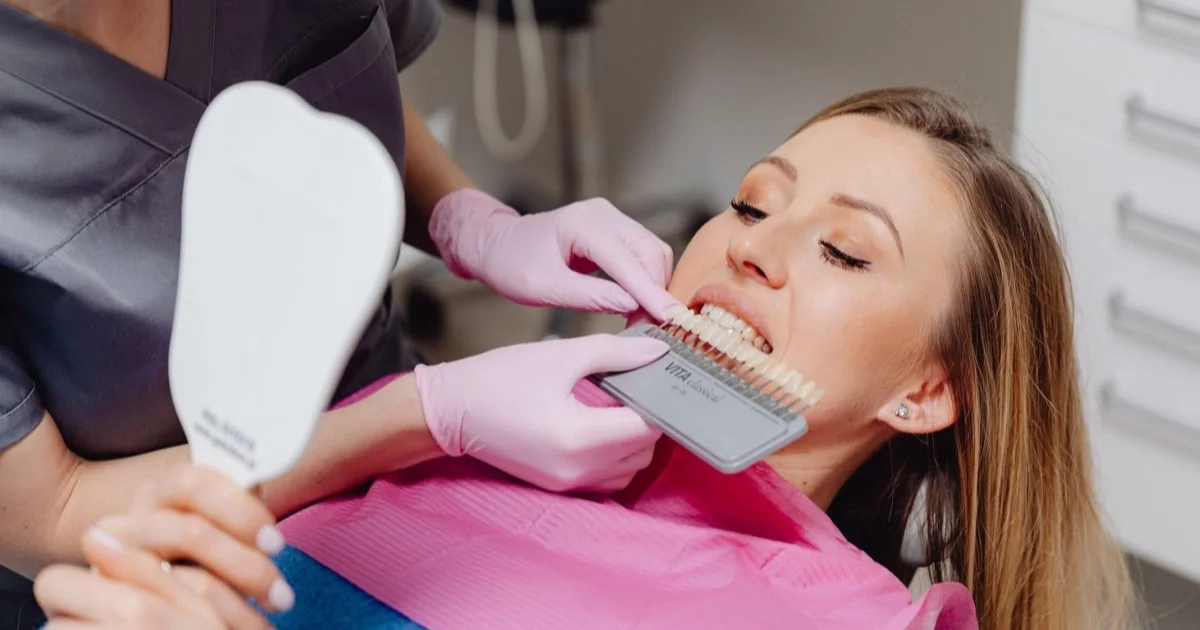
Shade matching is the process of matching the colour of a new veneer or crown to the neighbouring natural teeth. The dentist does this visually with a shade guide, digitally with a spectrophotometer, or with both together. It is not only about which shade: the differences between the cervical, middle and incisal zones of the tooth, its light transmission and its surface texture are all recorded too. According to systematic reviews, instrument-based measurement produces a smaller colour difference than visual selection, but the final decision is made under the dentist's supervision and with an in-mouth try-in.
If teeth whitening is also planned, the final shade is chosen roughly two weeks after whitening — otherwise the new restoration may stand out from the neighbouring teeth.
Key points
- A tooth is not a single colour: the cervical area is warmer and more saturated, while the incisal edge is more translucent.
- Visual selection is carried out with a shade guide (for example, VITA); a spectrophotometer measures colour numerically and does not depend on eye fatigue.
- Lighting directly changes the result — the shade should be selected in neutral light close to daylight.
- Colour is not chosen immediately after whitening: you need to wait for the shade to stabilise and for bonding quality.
- A veneer or crown on a single front tooth is the most difficult case; the try-in stage is especially important here.
Why is shade selection harder than it looks?
Most patients imagine shade selection as picking a tone from a catalogue. In reality, a natural tooth is a multi-layered structure: inside is dentin (the main, yellowish tissue of the tooth) and over it enamel (the translucent, hard outer layer). The colour we see is the combined effect of these two layers. Enamel thickness decreases with age and the dentin shows through more — which is why the tooth of a 50-year-old behaves differently from that of a 20-year-old.
Colour is described in three dimensions:
- Hue — the colour family: yellowish, reddish, greyish.
- Chroma — how intense that hue is.
- Value — how light or dark the tooth appears.
In practice, most mistakes happen with value. A veneer that is slightly too dark or slightly too light stands out even from a distance, whereas most people do not notice a small difference in hue. That is why the dentist first determines value, then chroma, and hue last.
The three zones of a tooth: cervical, middle and incisal
When a shade map is prepared, the tooth is conventionally divided into three zones:
- Cervical zone — the part close to the gum. Here the enamel is thin and the dentin shows through closely; the colour is warmer and more saturated.
- Middle zone — the base shade of the tooth is usually taken from here. The shade guide tone is matched precisely to this zone.
- Incisal zone — at the edge there is no dentin, only enamel. This part is translucent, often gives a bluish-grey cast and transmits light.
In addition, the dentist notes special details: white spots, cracks, the halo effect at the edge (the whitish line of the incisal edge) and the microtexture of the surface. The laboratory builds up the ceramic layer by layer according to this map. A veneer made without a map may be technically correct, yet look foreign next to the adjacent teeth.
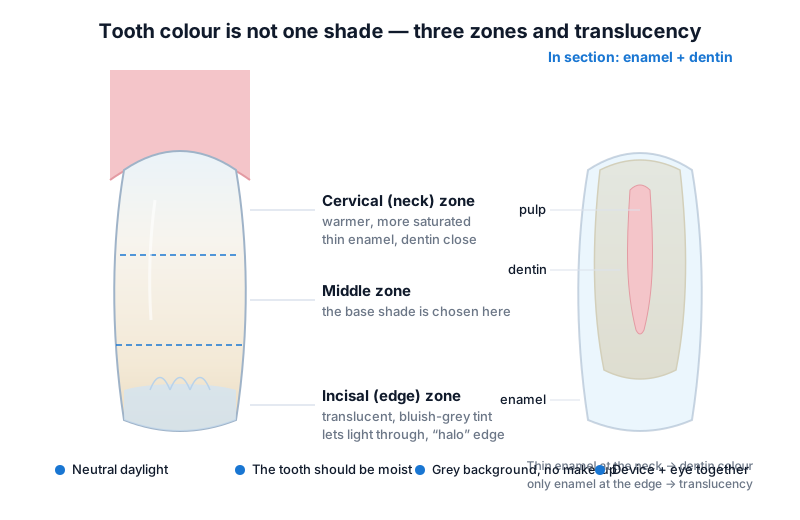 Shade map: the cervical zone is warmer and more saturated, the middle zone carries the base tone, and the incisal edge is translucent and transmits light.
Visual selection: how is a shade guide used?
In the traditional method, the dentist holds sample teeth from a shade guide (the most widely used being VITA Classical and VITA 3D-Master) next to the patient's tooth and compares them. This method is simple and quick, but it has several weak points:
- The eye tires. The human eye adapts to a colour after a few seconds. That is why the dentist frequently shifts their gaze to a neutral grey surface and makes the selection in short intervals.
- Light changes everything. The yellow lamp in the surgery, evening light through the window, the patient's bright lipstick or colourful clothing all skew the result. Studies point to light with a colour temperature of about 5500–6500 K and a high colour rendering index (CRI 90 and above) as the optimal condition; in the clinic, special daylight lamps or colour-corrected handheld lights are used for this.
- The tooth must not dry out. If a tooth is left in the air for 1–2 minutes it loses moisture and looks lighter. That is why the shade is selected at the beginning of the examination, while the tooth is still moist.
- Context. Teeth are seen against the background of the lips, gums and skin. A grey card is sometimes used to keep the background neutral.
The advantage of this method is that the dentist sees not only the colour but also the character: which tooth has which stain, how translucent the edge is. A device cannot always capture this.
Digital measurement: spectrophotometers and intraoral scanners
A spectrophotometer measures the light reflected from the tooth surface by wavelength and expresses the colour numerically (Lab* coordinates). It largely removes the factors of fatigue, lighting and subjective perception.
What does the evidence say? In a systematic review and meta-analysis published in 2023 (Morsy & Holiel; 6 clinical studies, 255 patients in total), the difference (ΔE) between the device-selected shade and the natural tooth was statistically significantly smaller than with visual selection. Spectrophotometers and digital cameras gave more accurate results than the visual method. Interestingly, in the same review, shade determination with intraoral scanners (in-mouth 3D scanners) did not differ from visual selection.
This is confirmed by another meta-analysis published in 2025 in the Journal of Esthetic and Restorative Dentistry (Vitai et al.; 23 studies): intraoral scanners give consistent results when measuring the same tooth repeatedly (repeatability is high), but their closeness to the true colour is lower compared with a spectrophotometer. The authors do not recommend using a scanner as the primary tool for shade determination.
The practical conclusion: an intraoral scanner is an excellent tool for impressions, but for colour you need either a spectrophotometer or an experienced eye in the right light. In the clinic, these two methods are most often applied together — the device provides the base tone, while the dentist adds the zones and the details.
| Criterion | Visual selection (shade guide) | Spectrophotometer | Intraoral scanner |
|---|---|---|---|
| Colour difference (ΔE) in studies | Greater | Smaller | Close to visual selection |
| Dependence on lighting | High | Low | Medium |
| Zone/detail map | Recorded by the dentist by hand | Some devices measure by zone | Limited |
| Repeatability | Depends on the dentist | High | High |
| Availability | In every clinic | Not in every clinic | In clinics with a scanner |
When is the shade chosen after whitening?
Many patients want to whiten their teeth first and then have veneers placed. This makes sense — veneers cover only the front teeth while the back teeth stay natural, so lightening the overall background first gives a better result. We have a separate article on the safety of teeth whitening.
However, for two reasons it is not right to select the shade and bond veneers immediately after whitening:
- The colour is not yet stable. After whitening, the tooth stays dehydrated for a while and looks lighter than it really is; over the following days the colour comes back somewhat. A shade chosen at this moment may later look excessively white.
- Bonding weakens. Whitening peroxide leaves residual oxygen in the enamel, and this interferes with the setting of the adhesive material. In a laboratory study published in the journal Materials in 2023 (Lopes et al.; on bovine teeth, whitening with 35% hydrogen peroxide), the bond strength of the luting cement to enamel was reduced 24 hours after whitening, and after 7 days it returned to a level close to that of the non-whitened samples. In the same work, applying sodium ascorbate (an antioxidant) restored the bond even at the 24-hour interval.
In clinical practice, an interval of at least 1–2 weeks is usually kept between whitening and veneer bonding; the exact time depends on the type of whitening and the dentist's protocol.
A single tooth or several teeth: what is the difference?
The most difficult scenario is making a veneer or crown for a single central incisor: the tooth beside it remains completely natural and every small difference shows. In this case the dentist usually:
- checks the shade several times, in different lighting;
- sends the laboratory photographs (with the shade tab next to the tooth, against a grey background) and a zone map;
- checks the finished work in the mouth with try-in paste before bonding (try-in) — the colour of the adhesive also has a slight effect on the final result;
- returns it to the laboratory for adjustment if needed.
When veneers are made for several front teeth at the same time, the situation is simpler: the colour is matched not to the neighbouring teeth but to the smile as a whole, and the patient's preference plays a bigger role. In such cases the shade decision is usually made at the digital smile design stage, on a mock-up (a temporary model).
How does the material affect the colour?
Shade selection cannot be considered separately from the material. With a thin veneer, the colour of the underlying tooth shows through the ceramic — for a dark tooth or one that has had root canal treatment, either a thicker or a less translucent material is needed. Lithium disilicate (E-max) is produced in different degrees of translucency, and this is exactly why it is often chosen for front teeth; there is detailed information in the article what is E-max. For the basics about veneers themselves, you can read the article what is a veneer.
Stains on the tooth itself and the causes of discolouration also change the choice — sometimes the cause of the stain needs to be clarified first (tooth discolouration and stains).
What can the patient do during shade selection?
- On the day of shade selection, avoid bright lipstick and colourful make-up; neutral-coloured clothing is preferable.
- If you are planning whitening, do it before the veneers and wait for the interval your dentist advises.
- Say exactly what you want: natural, not standing out from the back teeth is a different plan from noticeably white.
- Speak your mind openly at the try-in stage — once the work is bonded, the colour cannot be changed.
- The colour of a veneer does not change over time, but natural teeth can; because of this a difference may appear after a long period. This is a point to discuss in advance when veneer treatment is being planned.
Frequently asked questions
How many minutes does shade selection take?
Usually a few minutes; but for a single front tooth the dentist may re-check it in different lighting and take photographs. It is not worth cutting this time short.
Can the shade be chosen correctly in a clinic without a spectrophotometer?
Yes. On average a device gives a smaller colour difference, but with the right light, a moist tooth, a grey background and experience, visual selection also gives a suitable result. For a single front tooth, the help of a device is more valuable.
Can the lightest shade be chosen for a veneer?
It can, but on a single tooth or a pair of teeth this may look artificial. If veneers are being made for several teeth at the same time, a lighter tone looks more realistic. The dentist can show you in advance with a mock-up.
Does the colour of the luting cement change the result?
With a thin veneer — yes, to a slight degree. That is why the dentist first checks it in the mouth with the try-in paste for that cement and only then bonds it permanently.
How many days after whitening can a veneer be bonded?
In laboratory studies, a 7-day interval restores bond strength; in the clinic, 1–2 weeks are usually allowed for colour stability. Your dentist will tell you the exact time based on the type of whitening.
Conclusion
Shade selection is not about picking a number — the three zones of the tooth, translucency, lighting and the material are all taken into account together. Measurement with a device is on average more accurate, but the dentist's eye and the try-in stage are irreplaceable. If you are planning whitening, do it before the veneers and observe the waiting period. A consultation is useful for assessing your individual situation.
Sources
- Color difference for shade determination with visual and instrumental methods: a systematic review and meta-analysis — Systematic Reviews, 2023 (Morsy & Holiel)
- Color Comparison Between Intraoral Scanner and Spectrophotometer Shade Matching: A Systematic Review and Meta-Analysis — Journal of Esthetic and Restorative Dentistry, 2025 (Vitai et al.)
- Assessing the shade matching accuracy among dental students through visual and instrumental methods — Pakistan Journal of Medical Sciences, 2024 (Ahmed)
- Does the Elapsed Time from Bleaching and the Use of Sodium Ascorbate Influence the Bond Strength of Resin Cement to Bleached Enamel? — Materials (Basel), 2023 (Lopes et al.)
This article is for general information only and does not replace an individual diagnosis, examination or treatment. Consult a doctor for a decision about your case.