

Long-term care after an implant: how to keep your implant healthy for years
An implant itself cannot decay, but the gum and bone that hold it can become inflamed. That is why long-term care rests on three simple pillars: cleaning around the implant every day with a brush and an interdental aid, attending professional cleanings at the interval your dentist sets, and having follow-up X-rays when needed. This routine has to continue for years — the 2023 guideline of the European Federation of Periodontology (EFP) recommends a structured supportive care programme after an implant is placed.
Key points
- Plaque (a bacterial layer) builds up around an implant just as it does on a natural tooth; removing it daily is the foundation of preventing peri-implant inflammation.
- An ordinary brush does not reach the side surfaces of the implant — an interdental brush, superfloss or a water flosser is essential.
- The professional cleaning interval is set according to individual risk: 3, 6 or 12 months.
- The first (baseline) X-ray and probing measurements are kept for later comparison.
- Wear on the prosthesis, screw loosening and changes in the bite are also part of the check-up.
This article is about the period after initial healing. We have written about the first days after surgery and what to expect in terms of swelling and pain in the article is an implant painful.
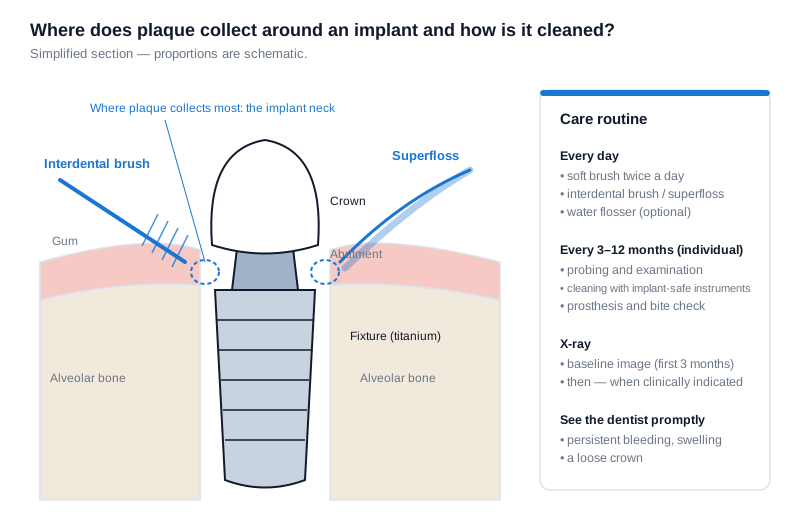 The zone between the implant neck and the gum is where plaque accumulates most — and that is exactly what an interdental brush and superfloss target.
Why does an implant need lifelong care?
An implant consists of three parts: the titanium fixture that joins the bone, the abutment screwed onto it, and the visible crown or bridge. None of these parts can develop decay. The weak point is elsewhere — the junction between the implant and the gum.
A natural tooth is attached to the bone by periodontal fibres; these fibres create a kind of protective barrier. There are no such fibres around an implant, and the gum simply attaches itself to the implant surface. As a result, bacteria pass beneath the gum more easily. At first, inflammation appears only in the soft tissue (peri-implant mucositis), and later the inflammation may spread to the bone (peri-implantitis). There is a separate article on the difference between these two conditions, their causes and treatment — what is peri-implantitis; here we are talking about preventing them in the first place.
Daily hygiene: with what and how?
Brushing
Twice a day, with a soft brush. Manual or electric brush — both are acceptable; a review published in the British Dental Journal (2024) notes that an electric brush is particularly useful for patients with limited hand movement. Hold the brush at a 45° angle to the implant neck so that the bristles reach slightly under the gum margin. There is no need to press hard — the aim is to lift the plaque off, not to scrub.
Interdental cleaning
This is the most important and most often forgotten part of implant care. The options are:
- Interdental brush — it reaches around the implant neck from the side. The same review shows that waisted brushes (thinner in the middle) are more effective than straight ones. The size is chosen by your dentist: too thin and it does not clean, too thick and it damages the gum.
- Superfloss — dental floss with a stiff end and a thick, sponge-like middle section. It is designed to be threaded under bridges and All-on-4 type prostheses.
- Water flosser (oral irrigator) — it rinses under the prosthesis and inside deep pockets with a jet of water. A review of 7 randomised studies published in BDJ Open (2025) shows that combining a water flosser with brushing reduced plaque and bleeding on probing around implants more than brushing alone; the authors rate the certainty of the evidence as low, which means this finding should be treated with caution.
Which aid is better? A meta-analysis published in the International Journal of Implant Dentistry (2025) gives an honest answer to this question: all the interdental aids examined reduce plaque and inflammation to some degree, but there is not enough data to prove that one is superior to another. The practical conclusion is simple — whichever one you find comfortable and use every day is the right one for you.
Mouthwashes
An antibacterial mouthwash (chlorhexidine, for example) is not an everyday product. Your dentist prescribes it for a short period — usually when there are signs of gum inflammation. With long-term use it stains the teeth and the prosthesis.
Professional cleaning: how often?
There is no single interval that suits everyone. Referring to the EFP S3 guideline, the BDJ (2024) review recommends planning check-up visits at 3, 6 or 12 month intervals according to individual risk. Factors that increase risk are: a history of periodontitis (gum disease), smoking, uncontrolled diabetes, poor plaque control and a prosthesis design that is difficult to clean. If any of these factors is present, the interval is shortened.
What happens at this visit?
- Examination and probing. Using light force, the dentist measures the pocket depth around the implant and notes whether there is bleeding or pus. The findings are compared with the baseline measurements (those taken when the implant was loaded or within the first 3 months).
- Removal of plaque and tartar. To avoid scratching the implant surface, titanium or carbon-fibre curettes, special ultrasonic tips or air-polishing with glycine powder are used. Ordinary steel curettes can scratch the implant surface, so it helps to remind the dentist that you have an implant.
- Checking the prosthesis. Screw loosening, cracks in the crown, changes in the bite.
We have written in more detail about how professional cleaning is carried out and about tartar in the article tartar and professional cleaning.
When is a follow-up X-ray needed?
An X-ray is the only way to see the bone level around the implant. According to the BDJ (2024) review, the basic principle is this:
- Baseline X-ray — taken when the implant is loaded or within the first 3 months after the crown is fitted. This is the zero point for all later comparisons.
- Later X-rays — not at every visit; they are taken when probing depth has increased, when there is bleeding or pus, or when a mechanical problem is suspected (screw loosening, fracture). Your dentist determines the frequency according to individual risk.
In other words, there is no general rule such as an X-ray every 6 months; an X-ray is taken based on the findings of the clinical examination. Ask for your baseline image to be kept at the clinic and to be given to you if you move.
Care of the prosthesis and crown
Even if the implant stays healthy in the bone, the crown or bridge on top of it wears over time. Be prepared for this:
- Screw loosening — you notice it as the crown moving or food packing underneath it. This is not implant loss; the dentist tightens the screw again.
- Cracked ceramic — especially in patients who clench their teeth at night (bruxism). A night guard may be recommended.
- With full-arch prostheses (All-on-4 type) the dentist may from time to time remove the prosthesis, clean underneath it and check the implants directly.
- With removable implant-supported prostheses (overdentures) the retaining components (locators, clips) wear out and are replaced.
We have explained why the implant and the crown on top of it have different lifespans in the article how many years does a dental implant last.
Lifestyle: what helps and what gets in the way?
- Smoking — the European Federation of Periodontology lists smoking as a risk factor for peri-implant disease. If quitting is not possible, cutting down still helps, and the check-up interval is shortened.
- Diabetes — when blood sugar is under control the risk drops significantly; share your HbA1c value with your dentist.
- Clenching / grinding — this places excess load on the implant; it is managed with a night guard.
- Hard foods — because an implant loses the sensation of biting, people often apply far too much force. Avoid nut shells, ice and bones.
Which signs mean you should not wait for your next visit?
- Bleeding, swelling or redness around the implant lasting more than a few days
- Movement of the crown or prosthesis
- Pain, a bad taste or an odour when brushing
- A change in the bite, a feeling that the tooth sits too high
Most of these signs are resolved simply at an early stage. You can read the full list and what counts as urgent in the article signs of implant failure. Any questions about your care plan can also be discussed during the consultation described on the dental implantation page.
Frequently asked questions
Can I choose the size of the interdental brush myself? It is better if your dentist or hygienist chooses it the first time: the brush should go into the gap easily, but with a little resistance. After that you can buy the same size at the pharmacy. If the gaps between your implants differ, you may need two different sizes.
Does a water flosser fully replace superfloss? Studies show that a water flosser reduces the signs of inflammation, but no aid has been proven to be definitively superior to another. For most people the combination that works best is a toothbrush + an interdental brush (or superfloss) + a water flosser.
Is it harmful to brush an implant with an electric toothbrush? No. An electric brush with a soft head is safe for the implant and the gums, and it is more comfortable for patients with limited hand movement.
What should I take with me when I change dentist? Your baseline X-ray image, the name and size of the implant system (the passport or label) and, if possible, your probing records. These allow the new dentist to compare bone levels.
Does care become easier as the years pass? No, the routine stays the same. It is simply that in patients with no problems the check-up interval may be extended to 12 months; in those with risk factors it stays at 3–6 months.
Conclusion
An implant's long life is decided not on the operating table but at home, every morning and every evening. Daily interdental cleaning, professional check-ups at your individual interval and an X-ray when needed — these three steps are the main way to keep the tissue around the implant healthy for years. To build a personal care plan, discuss your risk factors openly with your dentist during the consultation.
Sources
- Maintenance of peri-implant health in general dental practice — British Dental Journal, 2024
- Efficacy of oral irrigators compared to other interdental aids for managing peri-implant diseases: a systematic review — BDJ Open, 2025
- Optimizing implant hygiene: the added value of interproximal cleaning devices around implant-supported restorations — a systematic review and meta-analysis — International Journal of Implant Dentistry, 2025
- Guideline on treatment of peri-implant diseases (EFP S3 level clinical practice guideline) — European Federation of Periodontology, 2023
This article is for general information only and does not replace an individual diagnosis, examination or treatment. Consult a doctor for a decision about your case.